
This was so much fun for me.
A sweet friend linked me to an idea similar to this on pinterest. I searched and searched and found many ideas that I loved, and I put together my favorite aspects from each one and made it my own.
As most of you know, my husband enjoys card magic so this was just a natural fit for him.
I started with a deck of cards

I chose this deck because of it's already vintage, rustic look. I really wanted this project to look 'aged' and fun at the same time.
You can buy your own deck just like it here
Next I took a hole punch and made two holes in the cards. I did the first card and used each new card as a guide for the next one because I didn't want my holes to be much off, but didn't want them to line up perfectly either. If you want them to line up absolutely perfect, just use your first card as a guide for each other card.

After the holes were punched, we took a square of sand paper and sanded the cards down to scratch them up and make them look even more vintage than they already were (and the glue sticks better I found)
Kyley helped me some with this, she thought it was a lot of fun.

Next I took a roll of brown shipping paper, I'd bought earlier and thought would look great with the teal and brown cards and I ripped it into small squarish looking pieces with rough edges that would fit onto the cards but without covering the holes.


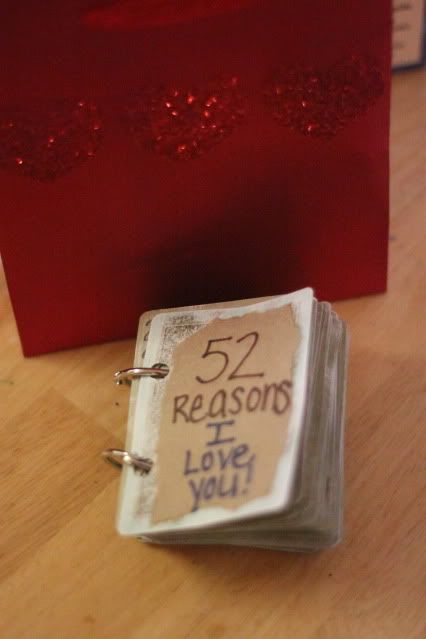
On each piece of paper I wrote one of 52 reasons I love him. (there are many more yall, I just narrowed it down to my favorite 52 at the moment).
I used school glue to glue the paper to the cards because the wetness of the glue then mishaped the card a bit, which I wanted to add even more to the vintage look of this.

I did this one by one, and laid them out to dry

This took me several days, mostly because of having 3 kids at home and other things to take care of, and also, having room to lay them out to dry.

When they were dry, I put them all together with simple 1 inch binder rings, which you can buy here.
I really love how it turned out!

I put it all together with some white tissue paper in this cute little bag to give to him on Valentine's day.

If you want to read about HIS reaction to the gift, you can read it here Also, he intends on writing a post a day with all 52 reasons in it, if you are interested in knowing what I wrote on them and the reasons behind it.
. 

I had so much fun putting all of this together, and I enjoyed even more the smile on his face watching him read them all. Now, someone help me fast because to top this I'm going to have to work HARD for next year haha.
Loved this! So cute!
ReplyDelete